
I was talking to someone the other day about the security of My Book It. It is something that I have always tried to build into the program with everything that I do. So far I think that I am doing a pretty good job of the security of the data. But as I was talking about this I started to think about any possible points that the data could be intercepted.
The issue that stuck out to me most was the transfer of backups between the server and my home which occurs each day. Up until that time I had only used standard FTP to transfer these images as it was the easiest to setup. This however caused a massive security hole in that anyone listening would be able to either
- See the data during transfer
- Extract the username and password and gain access to the backup destination. (And also the data stored in the backups)
This is a big issue. The entire system could be compromised by the backups if the person was able to intercept the stream. So I looked into what I could do about transferring them in a secure manner. I considered a VPN between my home and the server. This was a little clunky for this. (However I may still use this option in the future).
SFTP was also considered but discarded as it is going to a windows server. So in the end I settled for FTPS as I already had a certificate for the server.
Step 1: Extract the required SSL information
I needed to create a key and certificate file from the existing SSL certificate that was being used in Windows Certificate Store. I will be using an application called XCA to do this, which can be downloaded from SourceForge
- Open XCA
- Create a new database by clicking File –> New Database.
- Provide a name and location for the database, and set a password (This can be left blank)
- Select to import a certificate “Import PKCS#12”, and select the exported PFX certificate
- Enter the password and then select the “Import All” button to import all of the certificates.
- Select the certificate and then perform the following two exports
- PEM (*.crt)
- PEM + key (*.pem)
Step 2: Setup FileZilla Server
- Open the Filezilla Server console
- Click Edit and then Settings
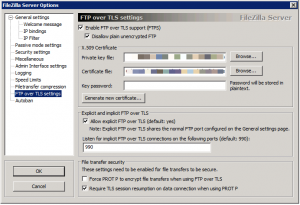
- Select FTP over TLS settings from the menu on the right
- Changed the following values
- Enable FTP over TLS support (FTPS) – Checked
- Disallow plain unencrypted FTP (Checked)
- Private Key File: Private Key extracted above
- Certificate File: Certificate Key extracted above
- Allow explicit FTP over TLS – Checked
- Explicit Port: 990
Now would be a good time to test the access to ensure it is all working.
Step 3: Adjust my backup Script
Last thing to do is to adjust my script to use FTPS rather then just FTP.
#!/bin/bash
HOST='ftp.server.com'
USER='ftpuser'
PASS='ftppass'

lftp -f "
debug
set ftps:initial-prot "";
set ftp:ssl-protect-data true;
set ssl:verify-certificate no;set ssl:
open $HOST
user $USER $PASS
mkdir /files

lcd /home/dean/Backups
mirror --reverse --delete --verbose /home/dean/Backups /files
bye
"
The lines that have been added are
debug
set ftps:initial-prot "";
set ftp:ssl-protect-data true;
set ssl:verify-certificate no;
These setup the FTP over TLS.
And that is now it, my backups are being sent over TLS to prevent anyone from being able to listen into the stream.