Building a TOR Transparent Gateway
This page will cover the TOR Transparent Gateway build from scratch (Post Alpine install)
The topology
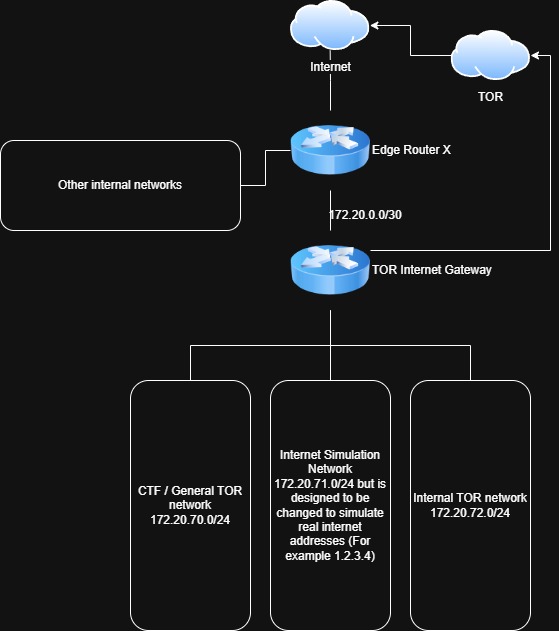
The gateway is dual-homed: one WAN interface faces the upstream router, and one or more LAN interfaces face the client networks. The gateway holds the .1 address on every LAN, so it is the default gateway for those segments — no awkward second box sitting silently in the same subnet, and no asymmetric routing.
Three design rules drive the whole setup:
- Clients can only reach the internet via TOR. Any attempt to route around the gateway should fail.
- The gateway itself only talks out on the ports TOR needs to build and maintain circuits. This is enforced upstream on the router.
- If TOR stops, nothing leaks. A default-drop forwarding policy is the kill switch.
- The networks are prevented from talking to other internal networks.
In this build the gateway runs as a Proxmox VM and serves three LANs, each on its own VLAN:
| Interface | Role | Address |
|---|---|---|
eth0 |
WAN — transit link to upstream router | 172.20.0.2/30 |
eth1 |
LAN — general TOR clients | 172.20.70.1/24 |
eth2 |
LAN — internet simulator | 172.20.71.1/24 |
eth3 |
LAN — internal TOR network | 172.20.72.1/24 |
Adjust the interface count and subnets to suit. The rest of this guide assumes the layout above.
Step 1: The transit subnet
Rather than dropping the gateway into the same broadcast domain as the upstream router, give it a dedicated point-to-point link. On the upstream router (mine is a Ubiquiti ER-X) configure a /30:
- Router side:
172.20.0.1/30 - Gateway WAN side:
172.20.0.2/30
A /30 gives exactly two usable addresses, which is all a point-to-point link needs.
Then add a static route on the upstream router sending all internal traffic to the gateway:
172.20.0.0/16 → 172.20.0.2
A single /16 summary route covers all three internal LANs — and any future ones — without needing a route per subnet.
Traffic management for internal networks to access back into these TOR networks is managed on the ER-X via its firewall.
Step 2: Install the packages
SSH into the Alpine host and install what the gateway needs:
apk update
apk add tor iptables unbound dnsmasq
- tor — the transparent proxy itself
- iptables — NAT redirection and the kill switch
- unbound — local caching DNS resolver
- dnsmasq — DHCP for the client LANs
Step 3: Enable IP forwarding
The gateway has to route between interfaces, so turn on IPv4 forwarding and make it persist:
echo "net.ipv4.ip_forward=1" >> /etc/sysctl.conf
sysctl -p
Step 4: Configure the interfaces
In Proxmox, attach one virtual NIC per network to the VM — one for the WAN transit link and one for each client LAN, each tagged to the right VLAN.
Then give each interface a static address in /etc/network/interfaces:
auto lo
iface lo inet loopback

# WAN side - transit link to the upstream router
auto eth0
iface eth0 inet static
        address 172.20.0.2/30
        gateway 172.20.0.1

# LAN side - general TOR clients
auto eth1
iface eth1 inet static
        address 172.20.70.1/24

# LAN side - internet simulator
auto eth2
iface eth2 inet static
        address 172.20.71.1/24

# LAN side - internal TOR network
auto eth3
iface eth3 inet static
        address 172.20.72.1/24
Only the WAN interface gets a gateway line — the LAN interfaces are the gateway for their segments. Bring the interfaces up with service networking restart.
Step 5: Configure TOR as a transparent proxy
Edit /etc/tor/torrc:
RunAsDaemon 1
Log notice file /var/log/tor/notices.log

VirtualAddrNetworkIPv4 10.192.0.0/10
AutomapHostsSuffixes .exit,.onion
AutomapHostsOnResolve 1

TransPort 0.0.0.0:9040
DNSPort 0.0.0.0:5353

# Prevent exiting on plain HTTP/HTTPS as a relay — clients still browse fine
ExitPolicy reject *:80,reject *:443,accept *:*

# Do not act as a relay
ExitRelay 0
RelayBandwidthRate 0
RelayBandwidthBurst 0

# Disable directory service participation
DirPort 0

# Disable the control port — not needed here
ControlPort 0
The two key lines are TransPort and DNSPort. TransPort accepts raw TCP connections that iptables redirects into it, and DNSPort is a DNS resolver that answers over TOR. AutomapHostsOnResolve lets .onion addresses resolve to virtual IPs so onion services work transparently. The remaining lines make sure this box is strictly a client and never a relay or directory mirror.
Step 6: Configure DNS
DNS is the easiest thing to leak. The setup here has two layers: Unbound is the resolver clients talk to, and it forwards every query to TOR’s DNSPort so nothing is ever resolved outside the tunnel.
It is worth being explicit about the forwarding — without it, Unbound tries recursive resolution against the root servers directly, which both mostly fails and leaks DNS outside TOR when it succeeds.
Edit /etc/unbound/unbound.conf:
server:
    verbosity: 1
    interface: 0.0.0.0
    port: 53
    do-ip4: yes
    do-not-query-localhost: no
    access-control: 127.0.0.0/8 allow
    access-control: 172.20.70.0/24 allow
    access-control: 172.20.71.0/24 allow
    access-control: 172.20.72.0/24 allow
    cache-min-ttl: 3600
    cache-max-ttl: 86400
    hide-identity: yes
    hide-version: yes

forward-zone:
    name: "."
    forward-addr: 127.0.0.1@5353
do-not-query-localhost: no is required — without it Unbound refuses to forward to 127.0.0.1, where TOR’s DNSPort is listening. Add an access-control line for every client subnet. The cache TTL floor cuts repeated lookups, which matters because every cache miss is a comparatively slow round trip through TOR.
Step 7: Configure DHCP
dnsmasq hands out leases to the client LANs. DNS is already handled by Unbound on port 53, so dnsmasq is used for DHCP only — its own DNS server is switched off.
Edit /etc/dnsmasq.conf:
# DHCP only - DNS is handled by Unbound on port 53
interface=eth1
interface=eth2
interface=eth3
bind-dynamic

# Disable the dnsmasq DNS server (Unbound owns port 53)
port=0

# eth1 - general TOR clients
dhcp-range=set:lan0,172.20.70.50,172.20.70.200,255.255.255.0,12h
dhcp-option=tag:lan0,option:router,172.20.70.1
dhcp-option=tag:lan0,option:dns-server,172.20.70.1

# eth2 - internet simulator
dhcp-range=set:lan1,172.20.71.100,172.20.71.200,255.255.255.0,12h
dhcp-option=tag:lan1,option:router,172.20.71.1
dhcp-option=tag:lan1,option:dns-server,172.20.71.1

# eth3 - internal TOR network
dhcp-range=set:lan2,172.20.72.100,172.20.72.200,255.255.255.0,4h
dhcp-option=tag:lan2,option:router,172.20.72.1
dhcp-option=tag:lan2,option:dns-server,172.20.72.1

dhcp-authoritative
log-dhcp
dhcp-leasefile=/var/lib/misc/dnsmasq.leases
Each LAN gets a set: tag so the router and dns-server options can be set per-segment — both point at the gateway’s address on that LAN.
Use bind-dynamic, not bind-interfaces. bind-interfaces requires every listed interface to exist the moment dnsmasq starts; if one is missing, dnsmasq crashes on launch. bind-dynamic copes with interfaces appearing later. If dnsmasq still won’t start after a config fix, check for a stale process holding the sockets and pkill dnsmasq before restarting.
Step 8: Configure iptables
This is where traffic is actually forced into TOR. The ruleset needs to do four things:
- Bypass TOR for local traffic — clients should reach other internal LANs directly, not via an exit node.
- Redirect all TCP into TOR’s
TransPort— not just web ports. SSH, mail, anything TCP gets onion-routed. - Redirect all DNS to TOR’s
DNSPort— even a client hardcoding8.8.8.8has its lookups forced through TOR. - Drop any LAN-to-WAN forwarded traffic — the kill switch. If TOR dies, nothing escapes.
Put the following in a script, e.g. /etc/tor-gw-firewall.sh:
#!/bin/sh

# Flush previous rules
iptables -F
iptables -t nat -F

# --- Local bypass (must come first) ---
for i in eth1 eth2 eth3; do
    iptables -t nat -A PREROUTING -i $i -d 172.20.0.0/16 -j ACCEPT
done

# --- Redirect DNS to TOR's DNSPort ---
for i in eth1 eth2 eth3; do
    iptables -t nat -A PREROUTING -i $i -p udp --dport 53 -j REDIRECT --to-ports 5353
    iptables -t nat -A PREROUTING -i $i -p tcp --dport 53 -j REDIRECT --to-ports 5353
done

# --- Redirect all new TCP connections to TOR's TransPort ---
for i in eth1 eth2 eth3; do
    iptables -t nat -A PREROUTING -i $i -p tcp --syn -j REDIRECT --to-ports 9040
done

# --- NAT outbound traffic on the WAN ---
iptables -t nat -A POSTROUTING -o eth0 -j MASQUERADE

# --- Default-drop forwarding (the kill switch) ---
iptables -P FORWARD DROP
iptables -A FORWARD -m conntrack --ctstate ESTABLISHED,RELATED -j ACCEPT

# Allow management networks in from the WAN to reach the LANs
for net in 10.0.0.0/8 172.16.0.0/12 192.168.0.0/16; do
    for i in eth1 eth2 eth3; do
        iptables -A FORWARD -i eth0 -o $i -s $net -j ACCEPT
    done
done

# Kill switch: no direct LAN-to-WAN traffic
for i in eth1 eth2 eth3; do
    iptables -A FORWARD -i $i -o eth0 -j DROP
done

# Allow SSH to the gateway from internal (RFC1918) sources on the WAN side
for net in 10.0.0.0/8 172.16.0.0/12 192.168.0.0/16; do
    iptables -A INPUT -i eth0 -p tcp --dport 22 -s $net -j ACCEPT
done
Two details matter:
- The local-bypass rules must come first. They
ACCEPT(skip the NAT chain) for anything destined to an internal subnet, so client-to-client and client-to-home-LAN traffic is routed normally instead of being shoved through an exit node. --synon the catch-all TCP redirect means it only matches new connections (SYN packets). Established connections are tracked by conntrack and don’t need to re-traversePREROUTING.
Make the script executable and run it:
chmod +x /etc/tor-gw-firewall.sh
/etc/tor-gw-firewall.sh
Step 9: Persist and start the services
Save the live iptables rules and enable everything to start on boot:
# Save the current iptables rules and enable the service
/etc/init.d/iptables save
rc-update add iptables

# TOR
rc-update add tor
service tor start

# Unbound
rc-update add unbound
service unbound start

# dnsmasq
rc-update add dnsmasq
service dnsmasq start
Keeping the firewall in a script (Step 8) means you can re-apply the whole ruleset instantly while iterating, then iptables save once it’s right.
Step 10: Test it
From a client on any LAN:
ping <gateway-address>               # the gateway should respond
nslookup google.com                  # DNS should resolve
curl https://check.torproject.org    # should confirm you are using TOR
curl -s https://api.ipify.org        # should return a TOR exit IP, not yours
If check.torproject.org confirms TOR and the exit IP isn’t your own, the gateway is working.
Troubleshooting
Useful commands when running on the gateway itself:
grep -i bootstrap /var/log/tor/notices.log | tail   # is TOR fully bootstrapped?
cat /var/lib/misc/dnsmasq.leases                    # current DHCP leases
iptables -t nat -L PREROUTING -v -n                 # are the REDIRECT rules being hit?
tail -f /var/log/messages | grep dnsmasq            # live DHCP activity
dig @127.0.0.1 -p 5353 google.com                   # test TOR's DNSPort directly
The packet counters from iptables -L -v are the most useful single check: if a client is trying to browse but the REDIRECT rule shows 0 packets, traffic isn’t reaching the rule and the problem is upstream — routing, the bypass rules, or the interface assignment.
The result is a network whose only path to the internet is through TOR — and which leaks nothing if TOR stops.
Return to Projects