
So now that I have my test machine in place the first thing I want to do is setup secure remote access to my private network. This should also cover the ability to route my traffic via my home when out and about if necessary. (for example overseas, or public WiFi locations)
So to do this I reviewed what options I have to gain remote access to my network. Below are my notes on the available options.
- SSH Tunnels – This would be fairly simple to setup and run except that if you are planning on doing a few items (i.e. want to browse your modem configuration, check on ESXi and SSH to another server) it seems to be fairly inefficient. Given that it is already setup and running when I allow SSH. It will provide a good alternative access.
- PPTP VPN – This would be the easiest way to allow remote access. Also the most insecure. Given that information I decided that it would be worth looking for an alternative.
- IPSEC/L2TP VPN – This is the option I ended up going with over OpenVPN. The primary reason is that the client is built into almost everything and it is fairly secure. (I don’t need to install the OpenVPN client on my Android, Windows etc) The need for no installation client was a huge plus for what I was looking for.
- OpenVPN – This one I did play around with, but in the end went with IPSec/L2tp VPN due to the wide availability of clients and easy of setup.
Lazy machine.
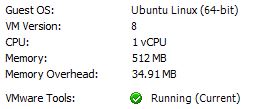
So to get it going I created a machine with the following specs on my ESXi setup.
- 1 CPU
- 512MB RAM
- 10GB HDD
The machine is not very powerful because all it will do is remote access into the network.
From this I installed Ubuntu Server and performed the updates. The only component I installed into the installation was OpenSSH. I also added the machine to be the first machine to be started on a host reboot.
After the installation was complete I closed all unnecessary ports on my modem that were pointing to various devices around my network and opened the required ports to the new machine. (I did consider placing the machine into a DMZ of sorts, but the machine will also run SNMP for monitoring. To prevent access to this I decided to map the required ports only.)
Next thing to do was to ensure that SSH was secure to prevent unauthorized access.
SSH
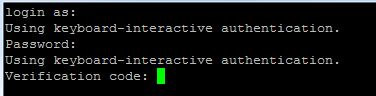
I wanted remote access to my server via SSH as I can do a lot of things remotely and quickly using putty. This will also allow me to hop onto other linux machines from the single point. (rather then having port translation occurring) So I wanted to ensure that SSH was secure, but still fairly easy to use. To do this I wanted to setup either certificate based authentication (Which i probably still will). But I have a Yubikey lying around which i thought I may be able to use to get two factor authentication going. After doing some research I stumbled across a website showing how to use Google Authenticator as the one time passwords for SSH. This would be perfect as I already use Google Authenticator for other accounts and it will allow me to use the YubiKey elsewhere as it only contains two options. I know the steps are on the other page, but I have replicated the steps I took here for future reference.
First install the required modules.
sudo apt-get install libpam-google-authenticator
Once installed setup the tokens by running (This is done per user, so some users can enable it and others don’t need to)
google-authenticator
This asked a number of questions which you will need to answer depending upon your environment. It will also provide you with the required setup information for the Google Authenticator App. (And one time (scratch) keys in case you need to gain access without the app)
Next I edited /etc/pam.d/sshd and added
#Enable Google Authenticator
auth required pam_google_authenticator.so
Then edited /etc/ssh/sshd_config and enabled this line
# Change to yes to enable challenge-response passwords (beware issues with
# some PAM modules and threads)
ChallengeResponseAuthentication yes
I restarted the SSH service but maintained my ssh session to ensure that I could regain access to the server.
sudo service ssh restart
Once it restarted I tested access ensuring the one time passwords work as expected before closing the original SSH session.
Now my phone is the weak point
In the next post I will setup the VPN Access.