
Once your content has been added to your website it will need to be arranged to reflect the layout you created when you mapped out your website. Content needs to be arranged so that people can access the information on your website quickly. Often a site that is difficult to navigate can loose visitors before they find the information they require.
Attention can be drawn to specific items by using menus, widgets and plugins.
This page will cover the different methods to organising your content on your website.
Widgets
Widgets are small containers that can be placed at different locations on your site. Widgets are capable of performing specific tasks depending upon the type of widget used.
For example you may have a widget that displays photos from your galleries, service times or a list of events from an events calendar. Depending upon your theme widgets may be arranged in a variety of methods. Some of these methods can be very simple methods; alternatively some themes allow complex arrangement of widgets to allow you to customise your site in great detail.
Widgets are dependent upon a number of important factors. Firstly the types of widgets that are available to your site and secondly the predefined areas that widgets can be placed within your site. Widgets and their settings can be found in the Appearance part of the dashboard.
To get to the widgets control area follows these steps
- Log into your Word press site.
- From the Dashboard click Appearance from the menu of the left side of the screen.
- Click Widgets from the submenu that appears. – Your screen will now be broken into two main areas. The left side of the screen is the available widgets that you have installed and can use on your site. On the right side of the screen are the areas on your website that you can place widgets.
- To place widgets, drag the widget from the left side of the screen into the correct widget container. Once the widget is in the correct location you can then configure the widget by using the options listed within the widget.
Menus
Menus serve two main purposes on any website. They allow quick and easy navigation to the information that your visitors will be looking for. Menus also allow information to be divided into categories and can be arranged to group similar pages, posts and links into groups.
Menus can be constructed in two methods. You can allow Word press to manage your menu or alternatively you can create your own structure To create a menu on your website:
- Log into your Word press site.
- From the Dashboard click Appearance from the menu of the left side of the screen.
- Click Menus from the submenu that appears.
From here there are a number of different steps you will need to complete in order to have your menu display on your site.
- A menu needs to be created. To create a menu types a name into the Menu Name box. If you already have a menu additional menus can be created by clicking the + button to add additional Menus. There is no limit to the amount of menus you can create, however you will only be able to use as many menus are the theme will allow you to display.
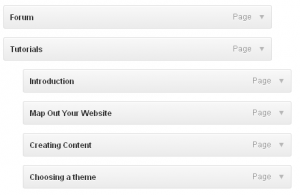
- The number of menus that you are able to have will be dependent upon the number of menus the theme will allow. Some themes will allow you to have a Primary and Secondary Menu. Some will allow you to have a Navigation and Footer menu. Menus can be selected using the Theme Locations box. The image below shows a primary menu with the following pages as menu items – Home, News, FAQ, Forum, Tutorials, Contact.
- To add items to a menu select it in the primary display area and then add items using the Custom Links, Pages, Categories, Picture tag and other boxes on the left side of the screen. Once an item has been displayed you are then able to arrange them into order and hierarchies by dragging the items into location. In the above image, you can see that a list of options under the Tutorials page, these have been added as sub-items to the Tutorial menu item in the Menu settings. In the menu this appears as the tutorial items being left indented from the Tutorial menu item, see image below.
Front Page
The main landing page or front page of your website can be configured to display different content. Your front page can be used to display a list of recent news items or alternative your can use it to display static content such as information about your Church.
The default option is to display a list of recent posts; this option can be changed in the following location.
- Log into your Word press site.
- From the Dashboard click Settings from the menu of the left side of the screen.
- Click Reading Settings from the submenu that appears.
On this page you are able to change what is displayed on the home page of your Website. You are able to alternate between your latest posts or a static page.
If you choose to display a static page you will then need to select that page from the list in the dropdown box labelled Front Page, if you wish to display your posts on another page you can select that page from the dropdown box labelled Posts page.
Please note that by changing this setting you will change the way that widgets are displayed on your site.